Slipstream
A Raspberry Pi 5 with a Logitech C270 webcam that turns a USB camera into a network camera. Anything on the network can pull the feed: OBS, a browser, or a script.
The whole thing in one picture
Video flows left to right. The camera is opened exactly once, by ffmpeg; everything else reads from MediaMTX.
The hardware
One self-contained node. It runs headless: no monitor, keyboard or mouse in normal use, just power and Wi-Fi.
| Part | What |
|---|---|
| Computer | Raspberry Pi 5 (CanaKit kit) |
| Camera | Logitech C270 USB webcam, 720p |
| Storage | SanDisk Ultra Plus 256 GB microSDXC |
| OS | Raspberry Pi OS, 64-bit |
| Network | Wi-Fi, with Tailscale for reaching it from anywhere |
| Power | USB-C. The power cable is the only cable that leaves the node. |
| Enclosure | Grey PVC electrical junction box with the Pi inside, a screw-down lid and vent holes drilled in the back. The camera clips to the top, wrapped in clear film, with a short USB cable down to the Pi. |
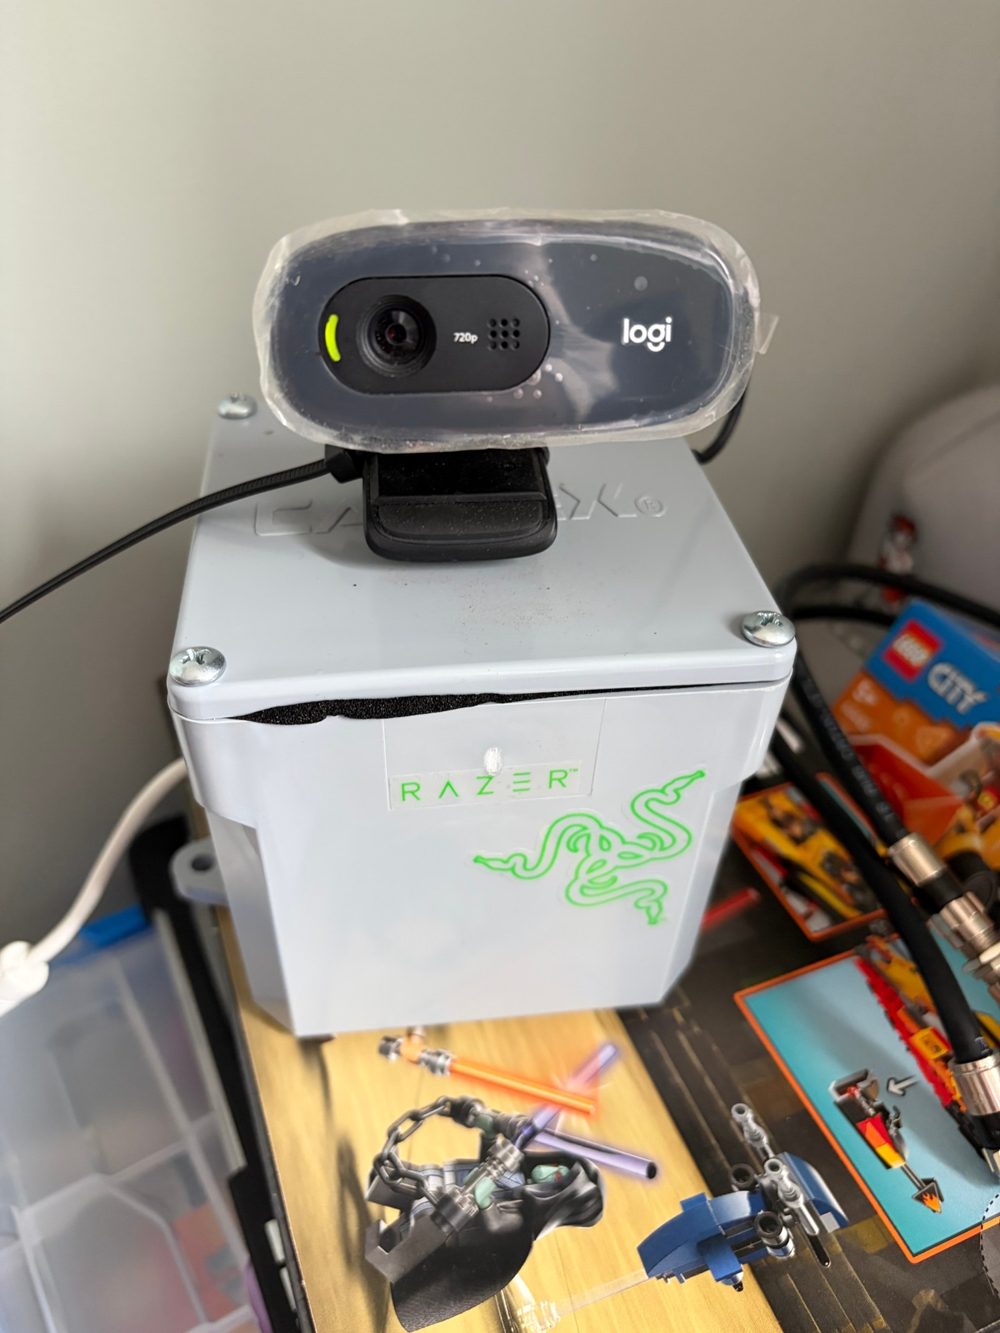
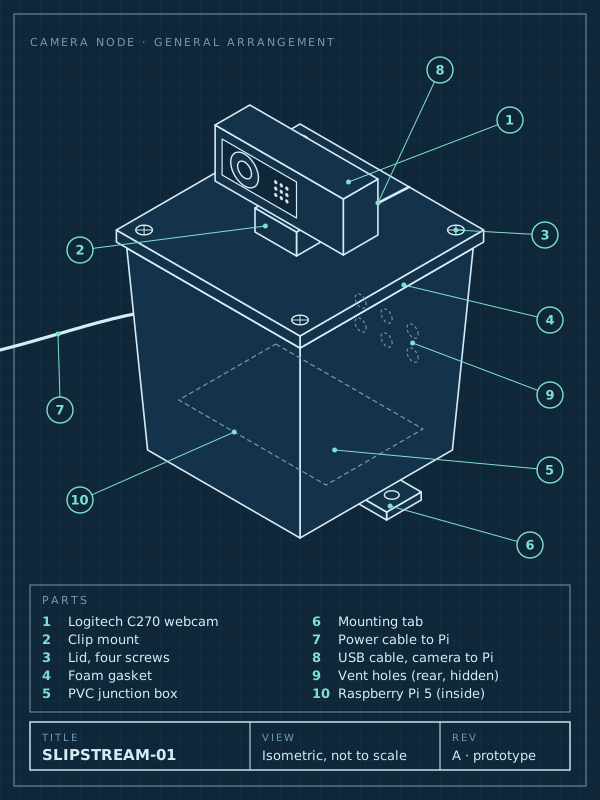
Nothing is exposed to the public internet. The node is reached over Tailscale or the local network only, and it asks for a password there too.
Use it
Once yours is built, these are the addresses. Replace YOUR-PI with your Pi's hostname and PASSWORD with the password install.sh prints.
| What | Where |
|---|---|
| OBS Media Source | rtsp://slipstream:PASSWORD@YOUR-PI:8554/cam (uncheck "Local File") |
| Browser view | http://YOUR-PI:8889/cam |
| Control page | http://YOUR-PI:8080/ |
| Health | http://YOUR-PI:8080/health |
| Still image | http://YOUR-PI:8080/still.jpg |
Everything asks for a login: user slipstream, and a password that exists only on the Pi. install.sh creates it on first run and prints it; sudo cat /etc/slipstream/password on the Pi shows it again. To change it, delete that file and run install.sh again.
How each piece works
1. The camera hands over MJPEG
The C270 can't send uncompressed 720p at 30 fps over USB 2, so it compresses each frame as a JPEG inside the camera. That stream of JPEGs is MJPEG. It is easy to produce but large, and neither RTSP players nor browsers want it, so it has to be converted.
The camera is addressed by its /dev/v4l/by-id/… path rather than /dev/video0, so it is still found if the Pi numbers its devices differently after a reboot.
2. ffmpeg re-encodes to H.264
ffmpeg decodes the JPEGs and encodes H.264, the format OBS and browsers both play. The Pi 5 has no hardware H.264 encoder, so this runs on the CPU with libx264. The settings all trade picture efficiency for low delay and low CPU use:
| Setting | What it does |
|---|---|
-video_size 1280x720 -framerate 30 | Asks the camera for its top mode. |
-preset ultrafast | The cheapest encoding effort. Keeps the Pi's CPU comfortable at the cost of needing more bitrate for the same quality. |
-tune zerolatency | The encoder emits each frame as soon as it arrives instead of holding frames back to look ahead. |
-g 30 | A full keyframe every 30 frames, which is once a second. A viewer who joins waits at most a second for a picture. |
-b:v 3000k -maxrate 3000k -bufsize 1500k | Holds the stream near 3 Mbit/s, with only half a second of slack, so the bitrate stays steady on the network. |
-pix_fmt yuv420p | The colour format every player supports. |
3. MediaMTX serves it
MediaMTX is a small stream server. It launches ffmpeg itself (runOnInit), receives the H.264 on the path cam, and re-serves the same stream in several protocols without re-encoding:
| Port | Protocol | Used by |
|---|---|---|
| 8554 | RTSP | OBS, VLC, ffmpeg, the health service's stills |
| 8889 | WebRTC | Browsers, with low delay |
| 8888 | HLS | Browsers, more delay but more forgiving (a MediaMTX default) |
| 9997 | Control API | The health service only; bound to localhost |
If ffmpeg exits, for example because the camera is unplugged, MediaMTX starts it again (runOnInitRestart). Plug the camera back in and the stream returns on its own.
4. health.py answers "is it working?"
A small Python HTTP server on port 8080. It also serves the control page and runs the current mode, described below. Its two status endpoints:
| Endpoint | Returns |
|---|---|
/health | JSON: whether the stream is ready, whether the camera is plugged in, CPU temperature, uptime, current mode. Status 200 when the stream is up, 503 when it is not, so a monitor only needs the status code. |
/still.jpg | One frame as a JPEG, or 503 if the stream is down. |
The still is taken from the running stream, not from the camera. A V4L2 camera can only be opened by one program at a time, and ffmpeg already has it.
5. systemd keeps it alive
Two units, both enabled at boot and both set to restart two seconds after any exit: slipstream-mediamtx.service and slipstream-health.service.
Deploy
The Pi runs whatever is in this repository. From the Mac, in the repo folder:
rsync -a --exclude .git ./ slipstream:slipstream/ && ssh slipstream 'bash ~/slipstream/pi/install.sh'install.sh installs ffmpeg and MediaMTX if they are missing, creates the password on first run, writes the MediaMTX config with that password to /etc/slipstream/, then installs and restarts the two services.
Modes
The camera stream always runs, so OBS and the browser view work in every mode. A mode decides what else runs on top of the stream. One mode is active at a time, and the choice survives a reboot.
| Mode | What it adds | Where the output goes |
|---|---|---|
| Live | Nothing. Just the stream. | OBS and browsers |
| Watch | Saves a snapshot when something moves, at most one every 20 seconds. | The SD card, shown on the control page |
| Timelapse | Saves a still every 60 seconds. | The SD card, shown on the control page |
Switching
The control page, served by the Pi on port 8080, has a button for each mode, a live view, and the most recent snapshots. The same switch is available as a command on the Pi:
slipstream-mode watchThe stream and the control page ask for a password, which exists only on the Pi. Commands run on the Pi itself need no password.
How Watch decides something moved
Twice a second it takes a tiny 160×90 greyscale copy of the picture and compares it with the previous one. If more than 1% of the pixels changed noticeably, it saves the current full-size frame. The thresholds and intervals are constants at the top of pi/modes.py.
Adding a mode
A mode is one Python function in pi/modes.py that reads from the stream, plus one entry in the MODES table. The control page picks up its name and description automatically.